Building EVL
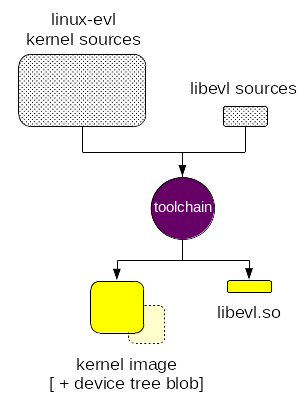
Building EVL from the source code is a two-step process: we need to build a kernel enabling the EVL core, and the library implementing the user API to this core - aka libevl - using the proper toolchain. These steps may happen in any order. The output of this process is:
-
a Linux kernel image featuring Dovetail and the EVL core on top of it.
-
the
libevl.soshared library* which enables applications to request services from the EVL core, along with a few basic utilities and test programs.* The static archive
libevl.ais generated as well.
Getting the sources
The Xenomai 4 sources are maintained in GIT repositories. As a preliminary step, you may want to have a look at the EVL development process, in order to determine which GIT branches you may be interested in these repositories:
-
The kernel tree featuring the EVL core:
-
The
libevltree which provides the user interface to the core:
Tip
Unlike its predecessor Xenomai 3, you do not need any additional patch to be applied to the kernel GIT tree mentioned above since it already contains the EVL core. Likewise, there is no preparation script to run: the kernel tree is ready to build from.
Other prerequisites
In addition to the source code, we need:
-
a GCC toolchain for the target CPU architecture.
-
the UAPI headers from the target Linux kernel aligned with the ABI requirements of
libevl.so. Those headers export the definitions and interface types whichlibevl.soshould use to interact with the EVL core from user-space, so that the former can submit well-formed system calls to the latter. In other words, to buildlibevl.so, we need access to the ABI-related files from a source kernel tree. Those headers may be directly available from the (cross-)compilation toolchain, or installed on the build host from some kernel-headers package. If not, the build system should be passed the-Duapioption to locate those files (see the explanations about configuring the build system for libevl).
Warning
libevl relies on thread-local storage support (TLS), which might be broken in some obsolete (ARM) toolchains. Make sure to use a current one.
Building the core
Once your favorite kernel configuration tool is brought up, you should see the EVL configuration block somewhere inside the General setup menu. This configuration block looks like this:

Enabling CONFIG_EVL should be enough to get you started, the default
values for other EVL settings are safe to use. You should make sure to
have CONFIG_EVL_LATMUS and CONFIG_EVL_HECTIC enabled too; those
are drivers required for running the latmus and hectic utilities
available with libevl, which measure latency and validate the
context switching sanity.
Tip
If you are unfamiliar with building kernels, this document may help. If you face hurdles building directly into the kernel source tree as illustrated in the document mentioned, you may want to build out-of-tree, which is how Dovetail/EVL developers rebuild kernels. If something goes wrong while building in-tree or out-of-tree, please send a note to the EVL mailing list with the relevant information.
All core configuration options
| Config symbol | Default | Purpose |
|---|---|---|
| CONFIG_EVL | N | Enable the EVL core |
| CONFIG_EVL_SCHED_QUOTA | N | Enable the quota-based scheduling policy |
| CONFIG_EVL_SCHED_TP | N | Enable the time-partitioning scheduling policy |
| CONFIG_EVL_SCHED_TP_NR_PART | 4 | Number of time partitions for CONFIG_EVL_SCHED_TP |
| CONFIG_EVL_HIGH_PERCPU_CONCURRENCY | N | Optimizes the implementation for applications with many real-time threads running concurrently on any given CPU core |
| CONFIG_EVL_RUNSTATS | Y | Collect runtime statistics about threads |
| CONFIG_EVL_NET | N | Enable out-of-band networking support |
| CONFIG_EVL_COREMEM_SIZE | 2048 | Size of the core memory heap (in kilobytes) |
| CONFIG_EVL_NR_THREADS | 256 | Maximum number of EVL threads |
| CONFIG_EVL_NR_MONITORS | 512 | Maximum number of EVL monitors (i.e. mutexes + semaphores + flags + events) |
| CONFIG_EVL_NR_CLOCKS | 8 | Maximum number of EVL clocks |
| CONFIG_EVL_NR_XBUFS | 16 | Maximum number of EVL cross-buffers |
| CONFIG_EVL_NR_PROXIES | 64 | Maximum number of EVL proxies |
| CONFIG_EVL_NR_OBSERVABLES | 64 | Maximum number of EVL (does not include threads) |
| CONFIG_EVL_LATENCY_USER | 0 | Pre-set core timer gravity value for user threads (0 defaults to pre-calibrated value) |
| CONFIG_EVL_LATENCY_KERNEL | 0 | Pre-set core timer gravity value for kernel threads (0 defaults to pre-calibrated value |
| CONFIG_EVL_LATENCY_IRQ | 0 | Pre-set core timer gravity value for IRQ handlers (0 defaults to pre-calibrated value |
| CONFIG_EVL_DEBUG | N | Enable debug features |
| CONFIG_EVL_DEBUG_CORE | N | Enable core debug assertions |
| CONFIG_EVL_DEBUG_MEMORY | N | Enable debug checks in core memory allocator. This option adds a significant overhead to the latency figures |
| CONFIG_EVL_DEBUG_WOLI | N | Enable warn-on-lock-inconsistency checkpoints |
| CONFIG_EVL_DEBUG_NET | N | Enable runtime consistency checks in the out-of-band networking stack |
| CONFIG_EVL_WATCHDOG | Y | Enable runtime consistency checks in the out-of-band networking stack |
| CONFIG_EVL_WATCHDOG_TIMEOUT | 4 | Watchdog timeout value (in seconds) |
| CONFIG_GPIOLIB_OOB | N | Enable support for out-of-band GPIO line handling requests |
| CONFIG_SPI_OOB, CONFIG_SPIDEV_OOB | N | Enable support for out-of-band SPI transfers |
Enabling 32-bit support in a 64-bit kernel (CONFIG_COMPAT)
Starting from EVL ABI
20 in the v5.6 series, the EVL core generally allows 32-bit
applications to issue system calls to a 64-bit kernel when both the 32
and 64-bit CPU architectures are supported, such as ARM (aka Aarch32)
code running over an arm64 (Aarch64) kernel. For arm64, you need to
turn on CONFIG_COMPAT and CONFIG_COMPAT_VDSO in the kernel
configuration. To be allowed to change the latter, the
CROSS_COMPILE_COMPAT environment variable should be set to the
prefix of the 32-bit ARMv7 toolchain which should be used to compile
the vDSO (yes, this is quite convoluted). For instance:
$ make <your-make-args> ARCH=arm64 CROSS_COMPILE=aarch64-linux-gnu- CROSS_COMPILE_COMPAT=arm-linux-gnueabihf- (x|g|menu)configTip
For instance, if you plan to run EVL over any of the Raspberry
PI 64-bit computers, you may find useful to
use the PI-centric 32-bit Linux distributions readily available such
as Raspbian. To do
so, make sure to enable CONFIG_COMPAT and CONFIG_COMPAT_VDSO for
your EVL-enabled kernel, building the 32-bit vDSO alongside as
mentioned earlier.
Building libevl
Installing meson
libevl is built using the meson build
system. The Meson project publishes a
well-written and helpful documentation for every stage, from writing
build rules to using them. First, you need to install this
software. Since Meson is shipped by most Linux distributions, you
should be able to install it via the common package management for
your system. For instance, the following command should do on a
Fedora-based system:
$ sudo dnf install meson ninja-buildSince meson is implemented in Python3, you also have the option to
get it from the recommended Python package installer (aka pip), as
described in this
document.
Using meson to build libevl
meson enables a common build and installation process, based on the
usual configure, compile and install steps. These steps always
happen in a separate build tree, as enforced by meson (in other
words, do not try building directly from the libevl source tree -
that won’t work, besides, this would be a Bad Idea TM to do
so).
The following process is based on meson 0.60.1. Earlier releases may
require a slightly different syntax, but the general logic remains the
same.
Configuration step
First, we need to configure the build tree for libevl. The generic
syntax for this is:
$ meson setup [--cross-file <x-file>] [-Duapi=<kernel-uapi>] [-Dbuildtype=<build-type>] [-Dprefix=<prefix>] [-Dinstall-uapi=<bool>] [-Dlatmon-port=<UDP-port>] $buildir $srcdirCommon configuration settings passed to
meson
| Variable | Description |
|---|---|
| $buildir | Path to the build directory (separate from $srcdir) |
| $srcdir | Path to the libevl source tree |
| <prefix> | The installation prefix (installation path is $DESTDIR/$prefix) |
| <build-type> | A build type, such as debug, debugoptimized, or release |
| <x-file> | A meson cross-compilation file defining the build environment |
| <kernel-uapi> | A path to the kernel source tree containing the UAPI headers |
| install-uapi=<bool> | A boolean value telling meson whether to install the UAPI headers (defaults to ’true') |
| latmon-port=<port> | An UDP port number the Zephyr-based latency monitor communicates over (defaults to 2306) |
A couple of pre-defined cross-compilation files is shipped with
libevl in the meson/ directory at the top level of the source
hierarchy ($srcdir/meson), namely:
- aarch64-linux-gnu
- arm-linux-gnueabihf
A cross-file content is fairly straightforward for anyone with a first experience using a cross-compilation toolchain, and fully documented there.
Other build settings
meson provides many other settings which influence the build and
installation processes. An exhaustive description is given in this
document.
Compilation step
Next, we run the compilation proper. The generic syntax for compiling
libevl from a configured build directory is:
$ meson compile [-v]-v tells meson to run verbosely, displaying every step it takes to
complete the build.
Installation step
Eventually, we can install the artefacts produced by the build
process. The generic syntax for installing libevl after a successful
build is:
$ [DESTDIR=<staging-dir>] ninja installAll the binary artefacts produced are copied to $DESTDIR/$prefix, using the $prefix set during the configuration step. For instance:
$ DESTDIR=/nfsroot/generic/armv7 ninja install
[1/211] Generating lib/git_stamp.h with a custom command
[2/211] Compiling C object lib/libevl.so.4.0.0.p/clock.c.o
[3/211] Compiling C object lib/libevl.so.4.0.0.p/event.c.o
[4/211] Compiling C object lib/libevl.so.4.0.0.p/flags.c.o
[5/211] Compiling C object lib/libevl.so.4.0.0.p/heap.c.o
[6/211] Compiling C object lib/libevl.so.4.0.0.p/init.c.o
[7/211] Compiling C object lib/libevl.so.4.0.0.p/mutex.c.o
[8/211] Compiling C object lib/libevl.so.4.0.0.p/observable.c.o
[9/211] Compiling C object lib/libevl.so.4.0.0.p/parse_vdso.c.o
[10/211] Compiling C object lib/libevl.so.4.0.0.p/poll.c.o
[11/211] Compiling C object lib/libevl.so.4.0.0.p/proxy.c.o
[12/211] Compiling C object lib/libevl.so.4.0.0.p/rwlock.c.o
				...
[210/211] Installing files.
Installing lib/libevl.so.4.0.0 to /var/lab/nfsroot/homelab/armv7/5.x-xenomai4/usr/lib
Installing lib/libevl.a to /var/lab/nfsroot/homelab/armv7/5.x-xenomai4/usr/lib
Installing benchmarks/latmus to /var/lab/nfsroot/homelab/armv7/5.x-xenomai4/usr/bin
Installing benchmarks/hectic to /var/lab/nfsroot/homelab/armv7/5.x-xenomai4/usr/bin
Installing utils/evl to /var/lab/nfsroot/homelab/armv7/5.x-xenomai4/usr/bin
Installing utils/evl-ps to /var/lab/nfsroot/homelab/armv7/5.x-xenomai4/usr/libexec/evl
Installing utils/evl-check to /var/lab/nfsroot/homelab/armv7/5.x-xenomai4/usr/libexec/evl
				...
Running custom install script '/bin/sh /work/git/xenomai/v4/libevl/meson/post-install.sh'
Eventually, unless you mentioned the -Dinstall-uapi=no switch on the
setup command line, the installation procedure goes on copying the
EVL-specific UAPI files libevl was just built against to
$prefix/include/uapi.
Cross-compiling libevl
With the information available from the previous section in mind,
let’s say the library source code is located at ~/git/libevl, and
the kernel sources featuring the EVL core with the UAPI headers we
need is located at ~/git/linux-evl. We want to build libevl so as
to target the ARMv7 architecture, specifically an i.MX6Q SoC.
Assuming we would compile using a linaro ARM
toolchain, we can use the
cross-file shipped with libevl named 'arm-linux-gnueabihf'. In
this scenario, cross-compiling libevl and installing the resulting
library and utilities to a staging directory located at
/nfsroot/imx6qp/usr/evl would amount to this:
# Create and configure the build directory
$ mkdir /tmp/build-imx6q && cd /tmp/build-imx6q
$ meson setup --cross-file ~/git/libevl/meson/arm-linux-gnueabihf -Dbuildtype=release -Dprefix=/usr/evl -Duapi=~/git/linux-evl . ~/git/libevl

# Build the whole thing
$ meson compile

# Eventually, install the result
$ DESTDIR=/nfsroot/imx6qp ninja install
That’s it.
Native libevl build
Alternatively, you may want to build a native version of libevl
system, using the native toolchain from the build host. Installing
the resulting library and utilities directly to their final home
located at e.g. /opt/evl is done as follows:
# Prepare the build directory
$ mkdir /tmp/build-native && cd /tmp/build-native
$ meson setup -Dbuildtype=release -Dprefix=/opt/evl -Duapi=~/git/linux-evl . ~/git/libevl

# Build it
$ meson compile

# Install the result
$ ninja install
Done.
Testing the installation
At this point, you really want to test the EVL installation.
